Let’s set the scene—you’ve just published your latest blog post, and it looks pretty good! However, when you go to share it on social media, you feel the image could be better, and the preview text isn’t as compelling as it could be.
The preview for your post essentially serves as its advertisement, and there are a number of ways you can control how these previews look when they show up in search and on social media.
In this post, we’ll guide you through a few simple ways to customize your link previews, and boost your traffic as a result. Let’s get started!
1. Set a Featured Image
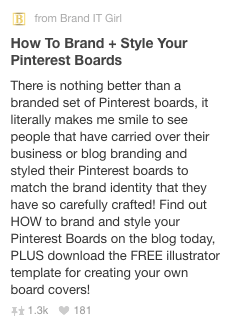
The featured image is the main graphic of a post, and it’s typically the first image on the page you’ll see. It’s also used as the default preview image when the link is shared on social media:
As with any piece of advertising real estate, taking control of this asset by designing a unique graphic for every post is a must. By optimizing each post, you maximize its potential to draw in the traffic it deserves.
This is especially important because images draw more engagement on social platforms such as Twitter and Facebook. Others, such as Pinterest and Instagram, completely rely on image-based posts. No matter the platform, featured images act as a billboard to catch the user’s attention as they scroll through the content.
[Tweet “Featured images act as a billboard to catch user’s attention as they scroll by your post.”]
For some good examples, take a look at the way we use featured images—they always have the same elements:
- An eye-catching related image or illustration.
- The title of the blog post displayed in large, easily read typography.
How to Do It
Firstly, choose a theme that supports featured images in WordPress. Each theme uses them a little differently, so it’s wise to try out a selection before making your final choice. When running the rule over a theme, think about the following:
- Where do featured images show up? For example, they could be displayed in the blog archive as well as at the top of each post.
- What images dimensions are optimal for that theme?
Find a balance between the perfect image ratio for your theme, and the recommended social media image sharing sizes. Next, optimize your image for the social media network where the biggest share of your audience is.
Once you’ve got your dimensions sorted, look to design a featured image for each unique post—services such as Canva make this quick and easy.
Finally, you can also use a plugin to automatically set your WordPress featured image as the preferred option for social sharing. Yoast SEO helps make this easy by implementing Open Graph tags, which enables you to connect your website with user activity on Facebook.

All that’s left is to set the featured image for your shared posts. If you happen to have a post that doesn’t call for a dedicated featured image, you can set a default shared image with Yoast SEO.
2. Register for Site-Specific Previews
When you share a link online, many social media sites will do their best to create a captivating preview of your site.
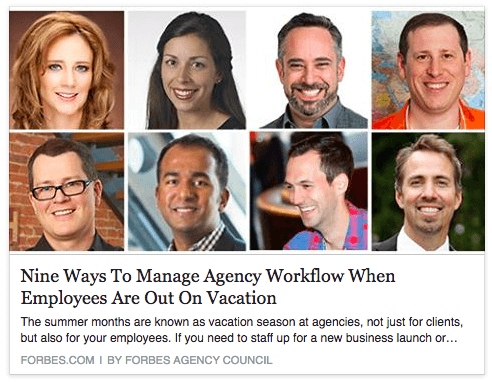
However, shared links from some sites may look better than others. For example, the featured image is always large, the headline is clear, and the preview text is a small snippet that grabs your interest. There may even be an author credit and user profile link:
This is because certain platforms (such as Pinterest) require you to register with them to get access to this kind of optimized preview. By registering yourself as a trusted media provider, and connecting the appropriate author accounts, they can hook up your social shares with their network and help drive more traffic.
How to Do It
Twitter Cards is the name of Twitter’s optimized preview program. Depending on the type of content you share, you can optimize for articles, images, video, audio, and apps.
Here’s how to get registered with Twitter Cards:
- Use Yoast SEO (or the plugin of your choice) to enable Twitter Cards.
- Validate that it’s working by testing out a blog post on Twitter’s Card Validator.
Once these two steps are complete, that’s it! While creating an account used to be a requirement, this is no longer the case. However, make sure you follow any directions provided by the validator to ensure your domain is whitelisted.
Rich Pins is Pinterest’s solution for optimized previews. Once again, there’s a variety of content to optimize for. Pinterest specializes in articles, places, recipes, products, movies, and apps.
Here’s how to get registered:
- Rich Pins operates using Open Graph, so if you’ve already set up Yoast SEO for Facebook, your site is ready to go for Pinterest.
- Validate your site using the Rich Pins validator.
- Finally, apply to get your Rich Pins on Pinterest by clicking the Apply Now button within the validator.
Google+ also lets you customize your site’s preview snippets. There’s no registration process, but Google do provide a lot of detailed information about how to control your previews.
Bonus: Provide a Sales Pitch
When it comes to text snippets, most social media sites will grab the first text it sees on the page, and use that for the preview. However, it may be that the first few lines of your blog post are rarely a perfect summary of what people can expect to find as they read on.
This actually extends beyond social media. Google will also look to pull the first couple of lines from your blog post if you haven’t provided a dedicated description.

It’s often wise to write a dedicated meta description for your posts, suitable for search engines such as Google.
You can rectify this by writing your own meta description for your blog posts, and there are a multitude of ways to do it.
How to Do It
Simply put, your meta description is a sales pitch for your page. Here are a few guidelines to follow when writing one:
- Address why this is the page your users are looking for.
- Make it no longer than 160 characters, so the entire description is viewable.
- Place the most important information at the beginning. Some sites have their own character limits, meaning the tail end of descriptions could be cut off.
The simplest option for adding a meta description to your post is by using Yoast SEO’s Snippet Editor within any WordPress edit page. Plus, Yoast SEO also automatically incorporates descriptions into Open Graph and Twitter Cards, keeping them consistent across the board.
You could also write a custom title within Yoast’s Snippet Editor to help sell the article, instead of relying on the on-page version. Once added, this becomes the default preview title on social media and search.
Conclusion
After writing a solid blog post, it’s important that the default presentation of the various social media platforms and search engines don’t stifle your attempts to win new traffic.
Optimizing your blog post’s previews is easy, and can help improve how much traffic you’re able to draw in. It only takes a few simple steps:
- Create dedicated featured images for your blog posts.
- Register for optimized previews on the various social media platforms.
- Write dedicated meta descriptions and titles for each post to replace the default text.
Do you have any questions on anything discussed in the article? Tell us more in the comments section below!