At some point, you may have heard that your business needs to ‘be everywhere’ to succeed. Sometimes though, it seems like a hopeless task—and besides, it isn’t always cost-effective to maintain daily activity around the web. However, that doesn’t mean you should settle for being invisible online.
Maintaining profiles on major networks such as Yelp and Google Business helps people to find your business, while also increasing brand awareness. Furthermore, keeping up-to-date profiles on these networks is necessary so customers aren’t turned off by outdated (or just plain wrong) information.
In this post, we present some checks you can make to improve your online visibility. Follow along if you’re ready to shed your invisibility cloak!

Key Takeaways
- Creating profiles on third-party and social media sites ensures potential customers can find you when they need you.
- Keeping these profiles consistent and updated strengthens your branding.
- You can prevent outdated profiles by setting a regular audit schedule.
1. Check Your Third-Party Review Profiles
Third-party sites rank well in Google, and have their own search engine capabilities.
There are many third-party review sites, but not all are worth joining for every business. For example, an eye clinic doesn’t need to join Zomato, which focuses on restaurants.
[Tweet “Check that a third-party review site is beneficial to your specific business before joining it.”]
New review sites are launched every day, while others disappear. It’s a good idea to regularly check in on which third-party review networks are alive and thriving. You can keep track of this by reading publications that cover social media news such as Mashable or Entrepreneur. They’ll help you make informed decisions about which networks your business might perform well on.
Here are a few of the top mature third-party review sites to help you get started:
Once you’ve selected your networks, it’s time tocreate your business profile—this is the part where your business goes from invisible to visible.
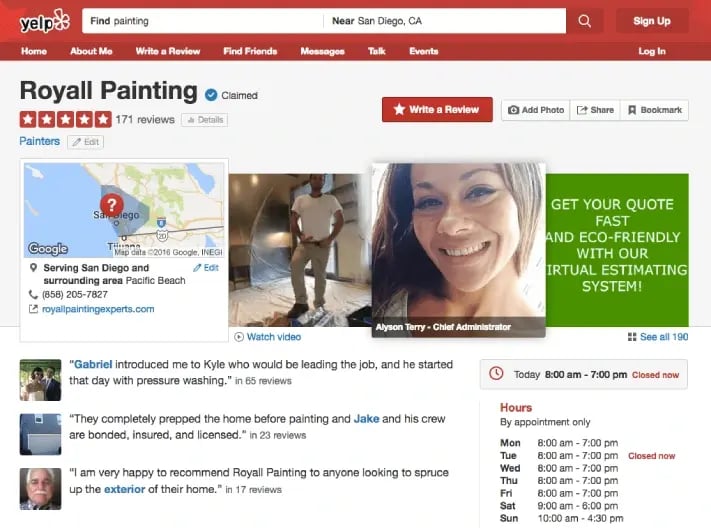
Firstly, look for unclaimed listings of your business. To do this, simply search the name of your business within the network. If your business has an existing profile created by a customer, it should show up as unclaimed—and there’s typically a link for business owners to claim their listing prominently displayed on the page:

Each site is different, so follow each network’s specific instructions to claim your listing. Doing this will help you maintain some control, instead of starting from scratch with a new profile.
However, if your business has no unclaimed listings, simply create a new one! Again, instructions for doing so will be specific to your chosen network.
Finally, keep a running list of any sites you register your business with. You can use Trello, Evernote, or Google Spreadsheets to do this—whatever tool works best for you.
2. Check Your Social Media Profiles
Social media enables customers easy access to useful business information, as well as direct interaction.
Much like review sites, not all social media platforms are worth staying active on. Of course, there are the obvious ones you should probably register for such as Facebook, Twitter, and Instagram. However, there are others to consider, such as:
- YouTube: Simply put, posting videos gets more views than any broadcast network.
- Google+: While not as big as Facebook, it’s still great for organizing communities.
- MySpace: A far cry from the dominating social network it once was, MySpace is now a thriving niche for those in the music industry.
Every network has its own nuances, so it’s worth spending the time to discover them before choosing which ones to sign up to.
Even if you don’t plan to post much content to social media, keeping control of your brand can be powerful. For a start, it stops others from registering your brand name on those sites, which can cause you hassle down the line. In other words, it can be worth checking in on the status of your social media regularly no matter what your goals are.
Once you’ve chosen a new social media site to register on, it’s time to set up your profile. While every network will have a specific set up procedure, there are some steps that will apply across the board.
Firstly, register as a business entity where possible. This option usually enables you to list extra information such as business hours. Some networks will also provide deeper analytics to see how people engage with your brand on the site.
Secondly, choose a username. Ideally, you want your exact brand name without spaces. For example, on Twitter, Acme Painting Bros would become @acmepaintingbros. You’ll also want to use the same branded profile photo across all your social media sites for consistency.
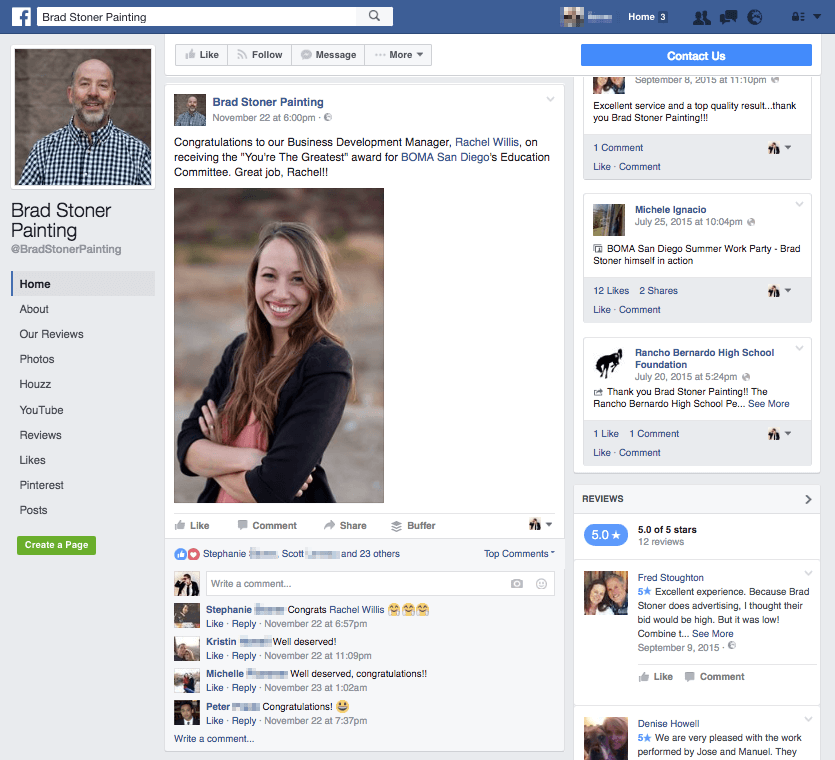
Next, write a compelling biography, making sure you include your unique value proposition—the length will depend on the website. For example, Facebook offers you the option of writing a short description in the sidebar, and a longer section in the About tab.
Of course, be sure to also add a link to your business website:

Finally, keep track of which sites you register your business on (similarly to how you track third-party review sites) to make things easier on yourself.
Bonus: Maintain and Monitor All of Your Profiles
Managing your online reputation is important. While building an audience everywhere isn’t required, basic maintenance definitely is. This helps to avoid misaligned branding or outdated information. However, how often you should audit your profiles depends on your business and customers.
To do this, firstly find your active list of profiles. You can optionally perform an in-depth audit, but don’t overcommit. At bare minimum, use your list to track each profile link and the date it was last updated.
We recommend auditing profile information at least once a month. If you’d like to post status updates, the recommended frequency ranges from one to five times per day, and tools such as Buffer or Hootsuite make it easy to batch schedule these.
To prepare for your audit, create a folder on your computer and collect the following information:
- Your current branded profile image.
- Your basic biography, which may need editing to fit character limitations on some profiles.
- Any additional data, such as opening hours or phone numbers.
Now, it’s time to clean house! Armed with this information, go through each of your profile links. For each one:
- Update the image and business information so it’s consistent across every site.
- Look for any messages or mentions left for your brand, and answer them.
- Address any negative comments or reviews appropriately.
Optionally, if you’re not already scheduling content, you can post one or two value-filled statuses. This will show the world the account has, in fact, been updated recently. The goal in this case is to show proof of life.
Conclusion
If new customers cannot find your business when and where they need it, it’s akin to being invisible. While search engine traffic is valuable, not all foot traffic comes from Google! You can increase your brand’s visibility across the web by keeping updated profiles on networks where your customers hang out.
You can steadily increase your visibility by regularly following this checklist:
- Check for new third-party websites to register with.
- Check for new social media websites in order to secure branded usernames.
- Review and update your business information for accuracy.
Do you have any questions relating to checking your online visibility? Let us know in the comments section below!